Madagascar Photography 2026: The Complete Guide to Shooting Wildlife & Landscapes
Affiliate disclosure: This article contains sponsored links to hotels, tour operators, insurance providers, and other travel services. We earn a small commission if you book through our links, at no extra cost to you.
Madagascar Photography 2026 — At a Glance
- Why it’s special: subjects found nowhere else on Earth — lemurs, chameleons, baobabs, tsingy — in landscapes and light that reward the patient photographer
- The iconic shot: the Avenue of the Baobabs at sunset, near Morondava — one of the world’s great photographic landscapes
- Best light: the dry season (April–November) for clear skies and reliable golden hours; the green months either side for lush colour
- The challenge: low light in the rainforest and fast-moving wildlife — fast lenses, patience, and a good guide make the difference
- Book photo-friendly tours: wildlife and landscape tours on GetYourGuide
- Plan a photo trip: a resident specialist can build a photography-focused itinerary — contact Carla
- Flight protection: EU261 €600 per passenger on disrupted European inbound flights
- Travel insurance: SafetyWing Nomad Insurance — cover your gear and yourself
- Where to stay: photographer-friendly stays in Madagascar on Agoda
Madagascar is one of the most rewarding and distinctive destinations on Earth for a photographer. Where else can you frame a lemur leaping through golden-lit forest, a chameleon’s eye filling the frame in macro, a row of thousand-year-old baobabs silhouetted against a blazing sunset, and a forest of razor-edged limestone pinnacles — all on one island, and most of it found nowhere else on the planet? This guide is the complete overview of photography in Madagascar: what to shoot and where, the best locations and light, the gear and techniques that work, a sample itinerary, the mistakes to avoid, what a photo trip costs, and how to plan one around your priorities. For the wider context, see our national parks guide.
The defining draw is uniqueness of subject. Madagascar’s wildlife and landscapes are like nowhere else — roughly nine in ten of its species are endemic — so your images are not variations on shots taken a thousand times elsewhere, but records of creatures and scenes that exist only here. The trade-off is that conditions can be demanding: rainforest light is low, wildlife is fast and often high in the canopy, and the best locations are remote. But for the photographer willing to work for the image, the rewards are extraordinary and genuinely original. Below, the subjects, the locations, the light, and the practicalities. For the adventure angle, see our adventure travel guide.
Why Madagascar Is a Photographer’s Paradise
Three things set Madagascar apart for photography. First, the endemic wildlife: lemurs, chameleons, and a cast of creatures found nowhere else, photographable in wild settings with the help of a good guide. Second, the iconic landscapes: the Avenue of the Baobabs, the tsingy limestone forests, the canyons of Isalo, the rainforest massifs — scenes of real grandeur and strangeness. Third, the light and atmosphere: dramatic dry-season sunsets, misty rainforest mornings, and the warm, low African light that flatters both wildlife and landscape. The variety of habitats packed into one island — rainforest, dry forest, canyon, highland, coast — means the light and mood shift dramatically from region to region, so a single trip can feel like photographing several different countries.
Together these make Madagascar a destination where a photographer can fill a portfolio with images that simply cannot be taken anywhere else. It is not the easiest place to photograph — the conditions demand patience, the right kit, and local knowledge — but that difficulty is part of why the results are so distinctive. Few destinations reward the dedicated photographer with such genuine originality. There is also a storytelling richness here that goes beyond single images: the same trip can yield a portfolio spanning intimate macro, dramatic wildlife action, sweeping landscape, and warm human documentary, all unified by a place unlike anywhere else. For the photographer building a body of work, or simply wanting images that stand out, that breadth within one destination is rare and valuable. And because so few photographers make the journey compared with the famous safari and wildlife hubs, your work is less likely to echo a thousand others. To understand the wildlife you’ll be framing, see our lemurs guide.
What to Photograph
Madagascar’s photographic subjects fall into a few rich categories.
Lemurs and wildlife
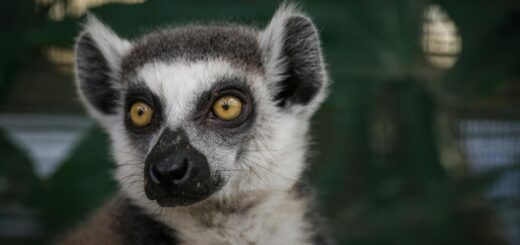
The island’s signature subject. From the leaping sifakas of the south to the indri calling in the eastern rainforest and the ring-tailed lemurs of Anja, lemurs are endlessly photogenic — and found only here. Photographing them rewards a telephoto lens, patience, and a guide who knows where they are and how they move. Beyond lemurs, the island offers chameleons, geckos, frogs, and birds, many endemic, for the wildlife and macro photographer. The challenge with lemurs is that they are fast, often backlit, and frequently high in the canopy, so a fast telephoto, a high ISO, and quick reflexes are your friends; the reward is intimate frames of an animal your viewers have likely never seen in the wild. Different species suit different approaches — the slow, posing sifakas of Anja are forgiving, while the leaping indri demand anticipation — and a good guide will read the troop and put you in the right spot. See our where to see lemurs guide.
Chameleons and macro subjects
Madagascar is the world chameleon capital — roughly half of all species — from the giant Parson’s to the tiny Brookesia, and they are a macro photographer’s dream: extraordinary colour, texture, and those independently swivelling eyes. Add the leaf-tailed geckos, vivid frogs, and strange invertebrates, and the island is a macro and close-up paradise, especially on night walks when many species emerge. Macro work here rewards a dedicated macro lens, a diffused light source, and patience: chameleons are slow and cooperative subjects, so you can compose carefully, focus on the eye, and play with the textures of skin and the curl of a tail. The Brookesia, some no bigger than a fingernail, are a particular thrill to capture, and the colour-shifting Parson’s and panther chameleons reward close, careful framing. Night walks are the macro photographer’s golden hour — torchlit, the forest yields sleeping chameleons and geckos that hold perfectly still. See our chameleons guide.
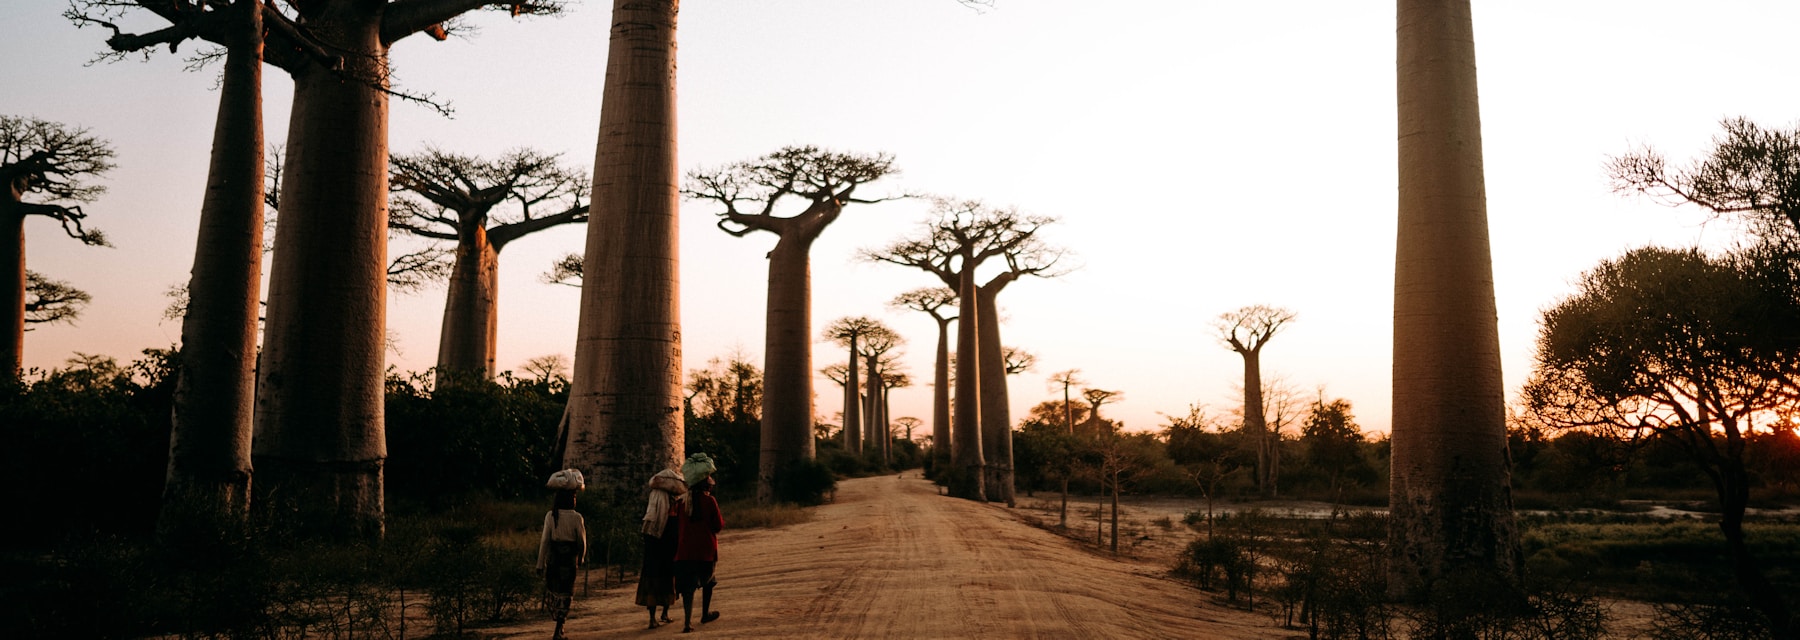
The Avenue of the Baobabs and trees
The single most iconic Madagascar image: the Avenue of the Baobabs near Morondava, a row of towering, ancient trees that glow at sunrise and sunset and silhouette against the dusk sky. It is a landscape photographer’s must, and the wider baobab country of the west offers endless compositions of these surreal trees. The Avenue rewards both the wide shot — the full row of giants against a fiery sky — and the intimate detail of a single trunk catching the last light, and the famous reflections in the wet-season puddles add another dimension. Arrive well before sunset to scout your composition and stay past it for the afterglow and the first stars; the same applies at dawn, when the crowds are thinner and the light just as good. Beyond the Avenue, the lone baobabs and the “baobab amoureux” (two trees entwined) offer quieter, more original frames. See our baobabs guide.
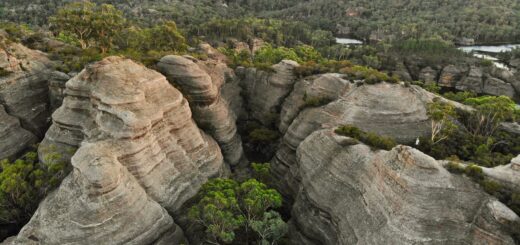
Tsingy, canyons, and landscapes
For dramatic landscape photography, the razor-sharp limestone pinnacles of the Tsingy de Bemaraha, the eroded sandstone canyons and oases of Isalo, the granite massifs of Andringitra, and the rainforest-clad mountains of the east offer scenes of grandeur and strangeness. The west’s baobabs-and-tsingy country is especially rich. The tsingy in particular is a study in light and shadow — the grey limestone needles take on warmth at the day’s edges, and the canyons and caves within offer dramatic contrast — while Isalo’s eroded ruiniform rock glows orange at sunset from its famous viewpoints. These landscapes reward a tripod, careful exposure for high-contrast scenes, and the patience to wait for cloud, light, and atmosphere to align. A polarising filter helps cut haze and deepen skies across all of them. See our western Madagascar guide.
People, culture, and coast
Beyond wildlife and landscape, Madagascar offers warm, characterful subjects: the markets and rural life of the highlands, the fishing pirogues and beaches of the coast, and the vibrant culture of its peoples (always photographed respectfully, with permission). The coast and islands add turquoise seascapes and palm-fringed beaches to the portfolio. The zebu cattle and rice paddies of the highlands, the colourful tomb art of the south, and the energy of a Malagasy market all make strong documentary and travel images, and the soft, smoky light of a highland morning is a gift for the street and portrait photographer. Treated with respect and curiosity, the human side of Madagascar can be as rewarding as its wildlife.
Best Photography Locations
Certain places stand out for the photographer. The Avenue of the Baobabs (near Morondava) for the iconic sunset; the Tsingy de Bemaraha for surreal limestone landscapes; Isalo for canyon and oasis scenery; Ranomafana and Andasibe for rainforest wildlife (lemurs, chameleons); Anja for accessible ring-tailed lemurs against granite boulders; and the far north (Amber Mountain, Ankarana) and the coasts for variety. A photography trip typically strings several of these together for a rich mix of wildlife and landscape. Each location also has its own best time of day and year — Anja’s lemurs are most active and approachable in the morning, the baobabs demand dawn or dusk, the tsingy needs the angled light of early or late day to model its texture — so a good photographic plan is as much about timing each stop as choosing them.
The classic photographic route follows the south (the RN7) for Ranomafana, Anja, and Isalo, often paired with a western leg for the baobabs and tsingy, and an eastern leg for Andasibe’s rainforest. Each region offers distinct subjects and light, and a well-planned itinerary maximises the variety and the time at each location for the right conditions. Because the regions are far apart and the roads slow, trying to photograph all of them in a short trip means spending your best light in a vehicle — so most photographers either focus on one or two regions in depth or allow three weeks to do the full circuit justice. The depth-versus-breadth choice is worth making consciously: a week spent thoroughly working the south and west will usually yield stronger images than a fortnight skimming the whole island. For the southern route, see our national parks guide.
A Sample Photography Itinerary
To picture how a photography trip comes together, here is a classic two-to-three-week shape that balances the island’s headline subjects with the time each needs to shoot well.
The south (RN7), around 7–10 days. Overland from Antananarivo, with rainforest wildlife and macro at Ranomafana (lemurs, chameleons, frogs on night walks), the boulder-and-lemur scenes of Anja, and the canyons and oases of Isalo for landscape, ending with sunrise and sunset sessions among the eroded rock. This stretch alone fills a portfolio with wildlife and landscape, and the paved road makes the logistics manageable.
The west, around 4–6 days. A flight or long drive to Morondava for the headline shot — the Avenue of the Baobabs at both sunrise and sunset — plus the surreal Tsingy de Bemaraha for dramatic limestone landscapes and the baobab country in between. This is the most iconic photographic leg, and the one most worth building extra time around for the light.
The east, around 3–4 days. Andasibe for the indri and accessible rainforest wildlife, an easy add-on from the capital on the paved RN2, strong for lemur and macro photography in dense forest. Many photographers do this leg first or last, bookending the trip with rainforest.
The key principle is to build in time — two sessions at the baobabs, repeat visits to a productive forest, the patience to wait for behaviour and light. A rushed circuit yields snapshots; a paced photographic itinerary yields images. A specialist can tailor this around your priorities, whether wildlife, landscape, or both. Contact Carla to plan it.
Best Time and Light
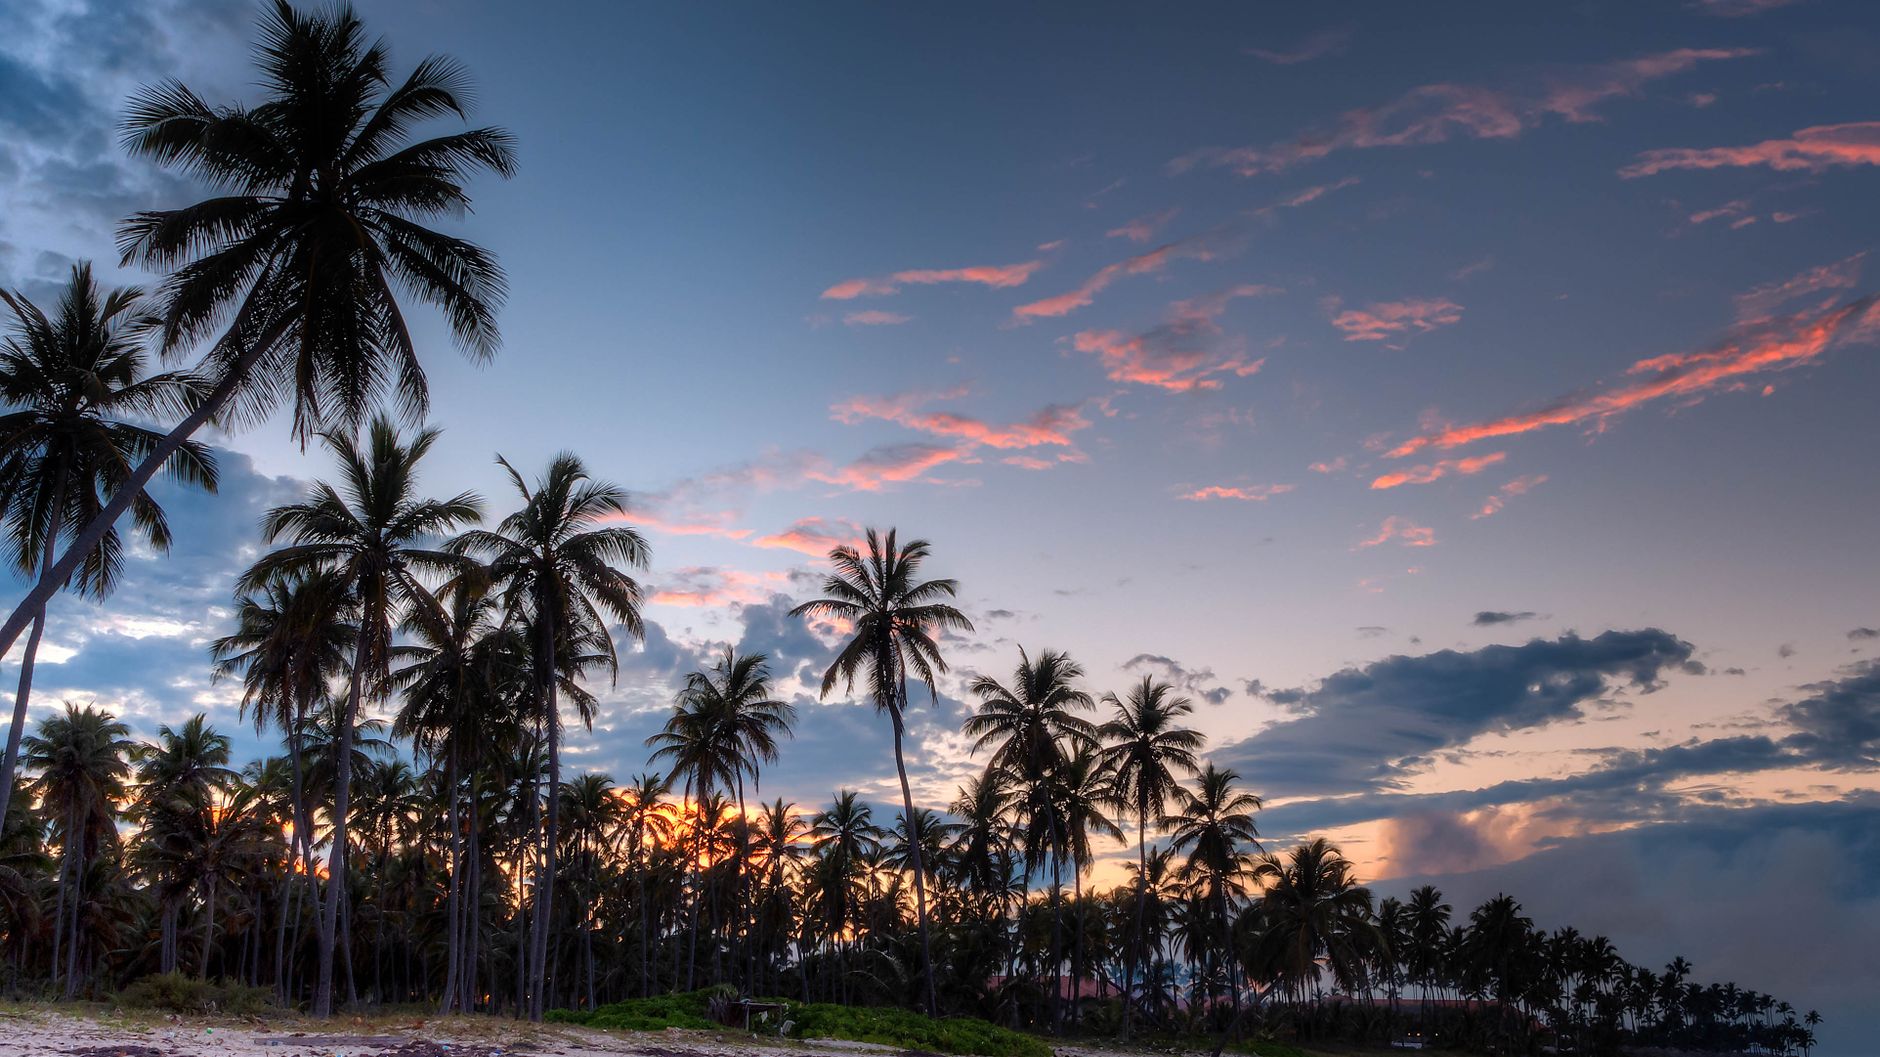
The dry season (April–November) is the prime photography window: clear skies, reliable golden hours, dramatic sunsets, and good wildlife-viewing as animals concentrate near water. The cooler months (June–August) bring crisp light and active wildlife; the shoulders (April–May and October–November) add lush green landscapes after the rains or warm, wildlife-rich conditions before them, and are superb for the photographer who wants colour as well as clarity.
As everywhere, the golden hours around sunrise and sunset are when Madagascar’s landscapes — above all the baobabs — come alive, so plan to be in position early and late. Rainforest interiors are dim even at midday, so the light there is more about diffuse softness than golden glow. The wet season (December–March) brings dramatic skies and the lushest growth but also rain, difficult access, and cyclone risk, so most photographers favour the dry months. That said, the season subtly changes your images: the late dry season (September–November) is hazier and browner but alive with newborn lemurs and active wildlife, while the early dry season after the rains is greener and clearer. Match the timing to your priorities — lush landscapes and baby animals, or crisp light and concentrated wildlife. Cloud is your friend for forest wildlife (it softens the harsh dappled light) and your enemy for a baobab sunset, so a flexible schedule that lets you chase the right conditions pays off. For the seasonal picture, see our best time to visit guide.
Gear for Madagascar Photography
Madagascar’s range of subjects rewards a versatile kit. For wildlife, a telephoto lens (a 100–400mm or longer) is essential for lemurs and birds high in the canopy, and fast apertures help in the low forest light. For macro, a dedicated macro lens transforms chameleon, gecko, and frog photography, and a flash or LED light helps on dim night walks. For landscape, a wide-to-standard zoom covers baobabs, tsingy, and canyons, and a sturdy travel tripod is invaluable for sunrise, sunset, and low-light scenes.
Beyond lenses, bring plenty of memory and battery (charging can be limited in remote areas), good protection from dust and humidity (the rainforest is wet, the west dusty), and a comfortable, weatherproof camera bag for long days on rough trails. Quality gear is hard to buy or repair in Madagascar, so bring everything you need, with backups of essentials. A specialist photo tour or guide can advise on the ideal kit for your planned subjects and locations. If you must travel light, a single versatile zoom (such as a 100–400mm) plus a wide zoom and a clip-on or compact macro option will cover most situations, though dedicated glass always does better. A headtorch with a red mode is invaluable for night walks, a rain cover protects your camera in the forest, and a lightweight beanbag or compact tripod steadies long lenses from a vehicle. Whatever you bring, weatherproof it and back up your images daily — humidity, dust, and the occasional rough road are hard on equipment and memory cards alike.
Techniques and Fieldcraft
Photographing Madagascar well is as much about fieldcraft as gear. For wildlife, work with your guide, who finds the animals and predicts their behaviour; move slowly and quietly, anticipate the leap or the turn, and shoot at high shutter speeds to freeze fast lemurs in dim light (raising ISO as needed). For macro, patience and a steady hand or tripod are key, and the still subjects of night walks (sleeping chameleons, geckos) are far easier than daytime movers.
For landscape, the golden hours are everything: arrive early, scout compositions, and use a tripod for the low light, bracketing exposures for the high-contrast baobab sunsets. Throughout, the single biggest factor in your success is time and patience — building enough time at each location to wait for the light, the behaviour, and the moment. This is exactly why a photography-focused itinerary, with longer stays and dawn/dusk positioning, beats a general tour for serious photographers. A few technical habits pay off everywhere: shoot RAW to recover the high-contrast skies and deep forest shadows in editing; meter carefully for the bright sky behind a baobab or you’ll silhouette the trunk to black; and watch your backgrounds in the forest, where a stray bright leaf can ruin an otherwise clean lemur portrait. Above all, slow down — the photographers who come away with the best Madagascar images are rarely the ones who saw the most, but the ones who waited the longest. For wildlife technique in depth, see our wildlife photography guide.
Why a Photography-Focused Trip Beats a General Tour
For serious photographers, a photography-focused itinerary is worth far more than a standard tour. The difference is time and timing: a general tour moves on a schedule built around seeing things, while a photo trip is built around capturing them — positioning you at the baobabs for both sunrise and sunset, lingering at a lemur sighting for the right behaviour, and building in the dawn and dusk hours when the light is best. A specialist photo guide also understands exposure, composition, and how to work a scene, not just where the animals are.
This is the core reason to plan a photography trip rather than tack photography onto a general one. The flexibility to wait for the light and the moment, and the local knowledge to be in the right place at the right time, are what separate snapshots from portfolio images. A resident specialist can build exactly this kind of itinerary around your photographic priorities. It is also worth choosing travel companions who share your pace: a non-photographing partner or a general-interest group can find the long waits and pre-dawn starts tiring, whereas a photo-focused group or a private trip lets everyone work to the same rhythm. Smaller groups matter especially for the prime positions — at the baobabs or a tight forest sighting, ten cameras jostling for the same angle helps no one, while a group of four or six can each find their composition in peace. For tour options, see our photography tour packages guide.
What a Photography Trip Costs
Photography travel in Madagascar costs more than a standard trip for a reason: it is built around time, access, and expertise. Photo tours tend to use small groups (so everyone gets the position and the light), longer stays at key locations, specialist photo guides, and the transport and guiding to reach the best spots — all of which add to the cost but are exactly what delivers the images. As with all Madagascar travel, the guide, vehicle, and logistics are largely fixed costs, so sharing within a small group keeps the per-person price reasonable.
The main costs are the specialist guiding, park fees, transport, accommodation, and the longer duration a photo trip needs. For a detailed breakdown, see our photography tour cost guide, and for the wider budget picture our national parks guide covers park fees. The value calculation for a photographer is different from a general traveller’s: you are paying not just to see Madagascar but to come home with images you could not make anywhere else, and the extra cost of time, small groups, and expertise is what converts the trip into a portfolio. Seen that way, a photo-focused trip is rarely the cheapest option but is often the best value for what a photographer actually wants from the journey.
Who Madagascar Photography Suits
Madagascar suits the patient, prepared photographer who values unique subjects over easy ones — wildlife and macro photographers drawn to the endemic lemurs, chameleons, and reptiles, and landscape photographers after the baobabs, tsingy, and canyons. It rewards those who come with the right kit, work with guides, and accept that the best images take time and effort in sometimes-demanding conditions. It suits keen amateurs and professionals alike — you do not need elite skills, just patience, preparation, and a willingness to work for the shot — and it is a particularly rewarding destination for the photographer who has done the obvious safari countries and wants something fresh, strange, and their own. The learning curve of its difficult light and fast subjects also makes it a place where photographers come back better than they arrived.
It suits less well the photographer wanting easy, open, big-game shooting in good light with minimal effort — that is more Tanzania’s offer than Madagascar’s. Here the subjects are unique but the conditions harder: forest light, fast or high wildlife, and remote locations. For the photographer who embraces that, though, Madagascar delivers a portfolio of genuinely original images few other destinations can match. It also suits photographers who enjoy the process as much as the result — the early starts, the patient waits, the problem-solving of difficult light — rather than those who want guaranteed, easy frames. If you relish working for an image and value rarity over convenience, you will love photographing here; if you want maximum keepers for minimum effort, temper your expectations or pair Madagascar with an easier wildlife destination. For how it compares, see our Madagascar vs Tanzania vs Costa Rica comparison.
Common Photography Mistakes
A few avoidable errors blunt many photographers’ Madagascar trips. The biggest is rushing — trying to see too much, so you arrive at the baobabs at the wrong hour, miss the light, and never linger long enough at a forest for the wildlife to perform. Build in time and timing, or hand that job to a photo-focused itinerary. The second is under-gunning for the conditions: arriving without a long enough telephoto for canopy lemurs, a fast enough lens for dim forest, or a macro for the chameleons that are half the appeal.
Other classic mistakes: neglecting the night walks, which are where the still, surreal macro subjects (sleeping chameleons, leaf-tailed geckos) are easiest to shoot; skimping on backups of cards, batteries, and cleaning kit in a place where you can’t replace them; ignoring dust and humidity that wreck unprotected gear; and shooting only the obvious, when the markets, faces, pirogues, and details often make the most memorable frames. The remedy for all of them is preparation and patience — the two qualities Madagascar most rewards in a photographer.
Responsible and Ethical Photography
Madagascar’s wildlife is fragile and its habitats under pressure, so ethical photography matters. Keep a respectful distance from wildlife, never bait, handle, or stress animals for a shot, and follow your guide’s lead on approach. Be careful with flash on sensitive nocturnal species, stick to trails to protect fragile ground, and always ask permission before photographing people. Support the local guides and communities whose knowledge makes your images possible — they are central to the experience and to conservation.
Responsible photography also means letting your images do good: photographs of Madagascar’s unique, threatened wildlife raise awareness and value for the wild places that need protecting. Travelling and shooting ethically, and choosing operators who support conservation and communities, is part of being a good photographer here. The wildlife that makes your portfolio possible depends on it. A simple discipline helps: prioritise the animal’s welfare over the shot every time, accept that some frames are not worth the disturbance, and remember that the calmest, most natural images come from animals that do not feel threatened. Photographers who move slowly, keep their distance, and let behaviour unfold not only do the right thing but usually get the better picture. The park guides who enforce these standards are protecting both the wildlife and the future of photography here.
Getting There and Travelling Well
Madagascar is reached by connecting flights via Europe, the Gulf, or Africa, landing at Antananarivo, from where you travel overland to the photographic regions. Book international flights early and protect European-routed ones: under EU regulation EC261, a long delay, cancellation, or denied boarding on an inbound European flight can entitle you to up to €600 per passenger — worth knowing when you’re travelling with valuable gear on a tight schedule. Register your flight for EU261 coverage with AirAdvisor. Reaching the best locations means long drives on rough roads; Carla can arrange transport.
Travel insurance is essential — and for photographers it should cover your expensive gear as well as medical emergencies and remote-area evacuation. SafetyWing Nomad Insurance covers the traveller; check whether you need separate or additional cover for high-value camera equipment, and confirm the details before you travel with thousands of euros of kit into remote terrain.
Carla / Voyagiste Madagascar (plan a photography trip)
Madagascar-resident specialist who can build a photography-focused itinerary — timing your days around the light, positioning you at the baobabs for sunrise and sunset, building in the patient hours at wildlife sites, and arranging the guides, transport, and access that great images require. Contact Carla directly for honest advice on the best locations, the right season, and how to structure a trip around your photographic priorities. Local knowledge is the difference between snapshots and a portfolio.
Frequently Asked Questions
What is the best photography subject in Madagascar?
The endemic wildlife — lemurs and chameleons found nowhere else — and the iconic Avenue of the Baobabs at sunset. Together they define Madagascar photography. See our wildlife photography guide.
When is the best time for photography?
The dry season (April–November) for clear skies and golden light; the shoulder months add lush green or wildlife-rich conditions. Golden hours are everything for the landscapes.
What gear do I need?
A telephoto for wildlife, a macro lens for chameleons and reptiles, a wide-to-standard zoom and tripod for landscapes, plus ample memory, battery, and dust/humidity protection. Bring backups — gear is hard to source locally.
Do I need a photography-specific tour?
For serious results, yes — a photo-focused itinerary builds in the time, timing, and expertise (longer stays, dawn/dusk positioning, photo guides) that a general tour can’t. See our photography tour packages guide.
How much does a photography trip cost?
More than a standard trip, because of small groups, longer stays, and specialist guiding — but sharing fixed costs in a small group keeps it reasonable. See our cost guide.
Should my insurance cover my camera gear?
Yes — photographers should ensure their cover includes high-value equipment as well as medical and evacuation. Travel insurance is essential; check gear cover separately.
📷 Plan Your Madagascar Photography Trip — With Carla
An itinerary built around the light and the wildlife, from baobab sunsets to rainforest lemurs. Reach out to Carla, our Madagascar-resident specialist, for honest advice and a trip designed around your photography.
Plan Your Trip to Madagascar
- Read the full Madagascar Travel Guide
- Explore itineraries by style and duration
- Explore the full destination guide
Where to Stay